Top-rated scenic hiking trails near me with waterfalls: Prepare to ditch the couch and embrace the wild! This isn’t your grandma’s nature walk; we’re talking cascading beauty, breathtaking vistas, and trails that range from “I could do this in my slippers” to “send help (and maybe a Sherpa).” Get ready to discover the perfect blend of adventure and awe-inspiring scenery, because we’re about to unlock the secrets to finding the ultimate waterfall hikes right in your backyard (or a short drive away!).
We’ll cover everything from how to define “near” to deciphering those cryptic trail ratings, ensuring your next hike is less “lost in the woods” and more “found in paradise.”
This guide will arm you with the tools and knowledge to locate and navigate these hidden gems, taking into account user location, various ranking systems (because not all five-star reviews are created equal!), and the crucial verification of those all-important waterfalls. We’ll delve into the nitty-gritty of trail characteristics – difficulty, length, elevation – and provide a visually stunning presentation of the best options, complete with high-quality images to fuel your wanderlust.
So, lace up those boots, grab your water bottle (and maybe a raincoat!), and let’s embark on this adventure together!
Defining “Near Me”

Finding the perfect waterfall hike starts with defining your search area. After all, “near me” is relative; a five-mile radius in rural Montana looks vastly different from a five-mile radius in the heart of Manhattan. This section will clarify how we determine your “near me” and ensure you find trails that are actually within a reasonable distance.We need to translate your vague notion of “nearby” into concrete coordinates that a computer can understand.
This involves getting your location and specifying a search radius. The process is surprisingly straightforward, albeit with some important privacy considerations.
Geographic Radius Determination
To determine your search radius, we offer a simple selection menu. You’ll be able to choose from pre-defined options like 5 miles, 25 miles, and 50 miles. This allows you to fine-tune your search based on your available time, transportation method, and hiking stamina. For example, a 5-mile radius might be perfect for a quick afternoon hike, while a 50-mile radius opens up possibilities for a weekend getaway.
Choosing a larger radius, however, will naturally increase the number of results and might require more filtering on your part.
Radius Translation for Location-Based Search
Once you’ve selected your radius, we convert it into a format compatible with location-based search APIs. Most APIs use a system based on latitude and longitude coordinates and a distance calculation. For instance, if you select a 25-mile radius and your location is identified as 40.7128° N, 74.0060° W (near Times Square, New York City), our system will use this coordinate as the center and generate a search area encompassing all points within 25 miles.
This involves complex algorithms that take into account the Earth’s curvature, ensuring accurate distance calculations. The specific implementation details depend on the API used (e.g., Google Maps Platform, Mapbox), but the underlying principle remains the same.
User Location Data and Privacy
Protecting your privacy is paramount. We offer two methods for determining your location:
We prioritize user privacy. Therefore, we only use IP address location if you explicitly consent. This method provides a less precise location estimate than GPS coordinates, and we only use it to provide a general area. We never store your precise location data and use only aggregated, anonymized data for analytical purposes.
Alternatively, you can manually enter your location. This gives you complete control over the data shared, and you can specify a location even if you don’t want to share your current IP address location. This option provides a more accurate search result if you input the correct coordinates.
Identifying Top-Rated Trails: Top-rated Scenic Hiking Trails Near Me With Waterfalls

So, you’re itching to hit the trail, but with a million hiking options out there, how do you find thecrème de la crème*? Choosing the perfect waterfall hike requires more than just a pretty picture on Instagram; it needs a strategic approach, a bit of digital detective work, and maybe a pinch of luck (for avoiding unexpected mudslides, naturally).
We’ll delve into the world of hiking trail rankings to help you navigate this wilderness of choices.Finding the top-rated trails involves a multi-faceted approach, incorporating various data points to create a well-rounded picture of each trail’s appeal. We’ll examine three key ranking systems, considering their strengths and weaknesses to guide you towards your perfect waterfall adventure.
Trail Ranking Systems: A Comparative Analysis
Three main ranking systems provide different perspectives on a trail’s quality. These are: average user ratings, expert reviews, and the number of visits. Each offers unique insights, and understanding their nuances is crucial for making an informed decision.
| Trail Ranking System | Data Source | Advantages | Disadvantages |
|---|---|---|---|
| Average User Rating | AllTrails, TripAdvisor, Hiking Project (data licensing varies by platform; check individual terms of service) | Reflects a broad range of experiences; provides a democratic perspective on trail difficulty, scenery, and overall enjoyment. Large sample sizes generally lead to more reliable averages. | Susceptible to bias (e.g., overly positive or negative reviews); may not accurately reflect the experience of all user groups (e.g., experienced vs. novice hikers). Individual ratings can be subjective and influenced by factors unrelated to the trail itself (weather, personal mood). |
| Expert Reviews | Outdoor magazines (e.g., Backpacker, Outside), professional hiking blogs, guidebooks (data licensing usually requires purchase or subscription) | Offers in-depth analysis; considers factors beyond user experience, such as ecological impact and trail maintenance; provides context and expertise. | Limited number of reviews; potential for bias from the reviewer’s personal preferences or affiliations; may not reflect the average user experience; access may require a paid subscription. |
| Number of Visits | Trail counters (physical or digital), park service data (often publicly available under open data licenses), AllTrails (requires checking their data licensing agreements) | Indicates popularity; suggests a well-maintained and accessible trail; useful for gauging crowd levels. | Doesn’t directly reflect trail quality; high visit numbers could indicate overcrowding or environmental degradation; low visit numbers may be due to poor accessibility or lack of awareness, not necessarily poor quality. |
Verifying Waterfall Presence

So, you’ve got your hiking boots laced up and your adventurous spirit ignited, but before you embark on a quest for the perfect waterfall hike, let’s make sure those cascading beauties actually exist! Navigating the world of online trail information can be like searching for Bigfoot – lots of blurry pictures and questionable testimonials. This section will equip you with the detective skills needed to sniff out the truth about those watery wonders.Verifying the existence of waterfalls on a hiking trail requires a multi-pronged approach, combining digital sleuthing with a healthy dose of skepticism.
We’re not just relying on one source; we’re building a case file! Think of it as a waterfall-finding CSI investigation.
Data Sources for Waterfall Verification
To confirm a waterfall’s presence, we’ll utilize several data sources. Each source offers unique advantages and limitations, highlighting the need for a comprehensive approach. A single source might mislead; multiple sources provide a more robust confirmation.
- Trail Maps: Many detailed trail maps, both online (AllTrails, for example) and physical, will explicitly mark waterfalls. However, the accuracy varies greatly. Some maps might be outdated or might simply lack the detail needed to verify the waterfall’s size and accessibility.
- User-Submitted Photos and Reviews: Websites and apps like AllTrails, TripAdvisor, and Yelp often feature user-generated content, including photos and reviews. These can be invaluable. However, always check multiple photos and reviews to account for potentially outdated or inaccurate information. A single picture of a small trickle might be labeled a “magnificent waterfall” by an enthusiastic hiker.
- Geographic Information Systems (GIS) Data: GIS data, often accessible through government websites or specialized mapping services, provides highly detailed geographical information, sometimes including water features. While highly accurate in terms of location, GIS data might not always specify the size or accessibility of a waterfall. A tiny stream might be marked as a “water feature” on a GIS map.
Integrating Data from Multiple Sources
Combining information from different sources is crucial. For example, a trail map might indicate a waterfall, but a GIS map might show only a small stream. Cross-referencing user-submitted photos can then help determine if the stream is indeed a substantial waterfall or just a minor water feature. If multiple sources – a detailed trail map, several recent photos showing a substantial flow, and GIS data confirming a water source – all corroborate the existence of a waterfall, you have a strong case!
Challenges and Inaccuracies in Waterfall Data
Data inaccuracies are common. Out-of-date information, subjective user reviews, and variations in water flow due to seasonal changes all contribute to uncertainty. For example, a waterfall that’s impressive during spring might be a mere trickle in summer. This highlights the importance of checking the date of photos and reviews. Additionally, some sources might use vague terminology, referring to a “water feature” without specifying its size or nature.
Addressing Data Inaccuracies
To mitigate inaccuracies, always prioritize multiple sources. Look for consistency across different platforms. If a waterfall is only mentioned on one obscure website without supporting evidence, treat it with healthy skepticism. Cross-referencing dates on photos and reviews is also essential to gauge the current state of the waterfall. Finally, remember that even with thorough research, some level of uncertainty might remain.
Embrace the element of surprise (and perhaps pack an extra bottle of water)!
Describing Trail Characteristics
So, you’re ready to conquer some scenic trails and chase those magnificent waterfalls? Fantastic! But before you lace up those hiking boots and embark on your adventure, it’s crucial to understand the trail’s personality. Think of it like choosing a rollercoaster – you wouldn’t jump on a terrifying mega-coaster if you’re a first-timer, would you? Knowing the trail’s characteristics will ensure you have a safe, enjoyable, and maybe even slightly less sweaty experience.Understanding a trail’s characteristics is essential for planning a successful hike.
Failing to do so can lead to anything from mild disappointment (arriving to find it’s a 10-mile slog when you only packed a granola bar) to serious trouble (underestimating the difficulty and getting stranded). Let’s equip you with the knowledge to make informed decisions.
Remember to click where are the best hiking spots near me with little elevation gain to understand more comprehensive aspects of the where are the best hiking spots near me with little elevation gain topic.
Trail Characteristic Details
To properly assess a trail, we need a few key pieces of information. Think of it as a trail’s “vital statistics.” These stats will help you determine if the trail is a good fit for your skill level and physical condition.
- Difficulty Level: This indicates the overall challenge of the trail, considering factors like terrain, elevation changes, and length. We’ll break down what this means below.
- Trail Length: This is simply the total distance of the trail, typically measured in miles or kilometers. A shorter trail is obviously less time-consuming, but don’t underestimate the impact of elevation gain!
- Elevation Gain: This refers to the total vertical ascent you’ll experience throughout the hike. A significant elevation gain can dramatically increase the difficulty, even on a relatively short trail. Think of it as the “vertical miles” you’ll conquer.
- Estimated Hiking Time: This provides a rough estimate of how long it will take to complete the hike, considering a moderate pace. Remember, this is just an estimate; factors like breaks, photography stops (because, waterfalls!), and your personal fitness level will affect your actual hiking time.
- Accessibility Features: This encompasses aspects like trail surface (paved, gravel, rocky), presence of stairs or steep inclines, and any potential obstacles (e.g., stream crossings, narrow sections). This information is especially important for hikers with mobility limitations.
Difficulty Level Descriptions
Let’s clarify what those difficulty levels actually mean in terms of your physical exertion and the type of terrain you’ll encounter.
Do not overlook explore the latest data about top rated parks near me with well-maintained walking trails.
- Easy: Imagine a gentle stroll through a park. Easy trails typically feature well-maintained paths, minimal elevation gain, and relatively flat terrain. Think a leisurely walk, suitable for families and casual hikers. Example: A paved trail along a riverbank with only a slight incline.
- Moderate: Moderate trails involve some elevation changes, potentially some uneven terrain, and might require a bit more stamina. You’ll likely experience some uphill climbs, but nothing too extreme. Example: A trail with some rocky sections and a gradual incline leading to a scenic overlook, requiring a moderate level of fitness.
- Strenuous: Prepare for a workout! Strenuous trails often involve significant elevation gain, steep inclines, rough terrain (think rocky paths, uneven surfaces, potentially scrambling), and longer distances. These trails demand a high level of fitness and preparedness. Example: A trail with steep, rocky ascents, significant elevation gain, and possibly some exposure to heights, requiring excellent fitness and possibly specialized hiking gear.
Presenting Trail Information
Presenting information about scenic hiking trails with waterfalls requires a delicate balance: we need to be both informative and inspiring, painting a picture vivid enough to make readers grab their boots and hit the trail, but also practical enough to help them plan their adventure successfully. We achieve this through a combination of clear, concise writing, visually appealing formatting, and captivating imagery.
Trail Information Presentation Format, Top-rated scenic hiking trails near me with waterfalls
A well-structured list is crucial for presenting multiple trails. Using nested lists allows for a hierarchical presentation, moving from the overall trail overview to specific details. This approach helps users quickly scan and locate the information most relevant to their interests. Think of it as a visual roadmap to hiking nirvana.
- Trail Name: Emerald Falls Adventure
- Difficulty: Moderate
- Distance: 5 miles
- Elevation Gain: 1000 feet
- Waterfall Features: A stunning 70-foot cascading waterfall, perfect for a refreshing dip (if you’re brave enough!). Several smaller waterfalls along the way.
- Trail Name: Whispering Pines Waterfall Hike
- Difficulty: Easy
- Distance: 2 miles
- Elevation Gain: 200 feet
- Waterfall Features: A gentle, picturesque waterfall surrounded by towering pines, ideal for a relaxing afternoon stroll.
- Trail Name: The Raging River Ramble
- Difficulty: Strenuous
- Distance: 8 miles
- Elevation Gain: 2500 feet
- Waterfall Features: A powerful, multi-tiered waterfall plunging into a rocky gorge. Not for the faint of heart!
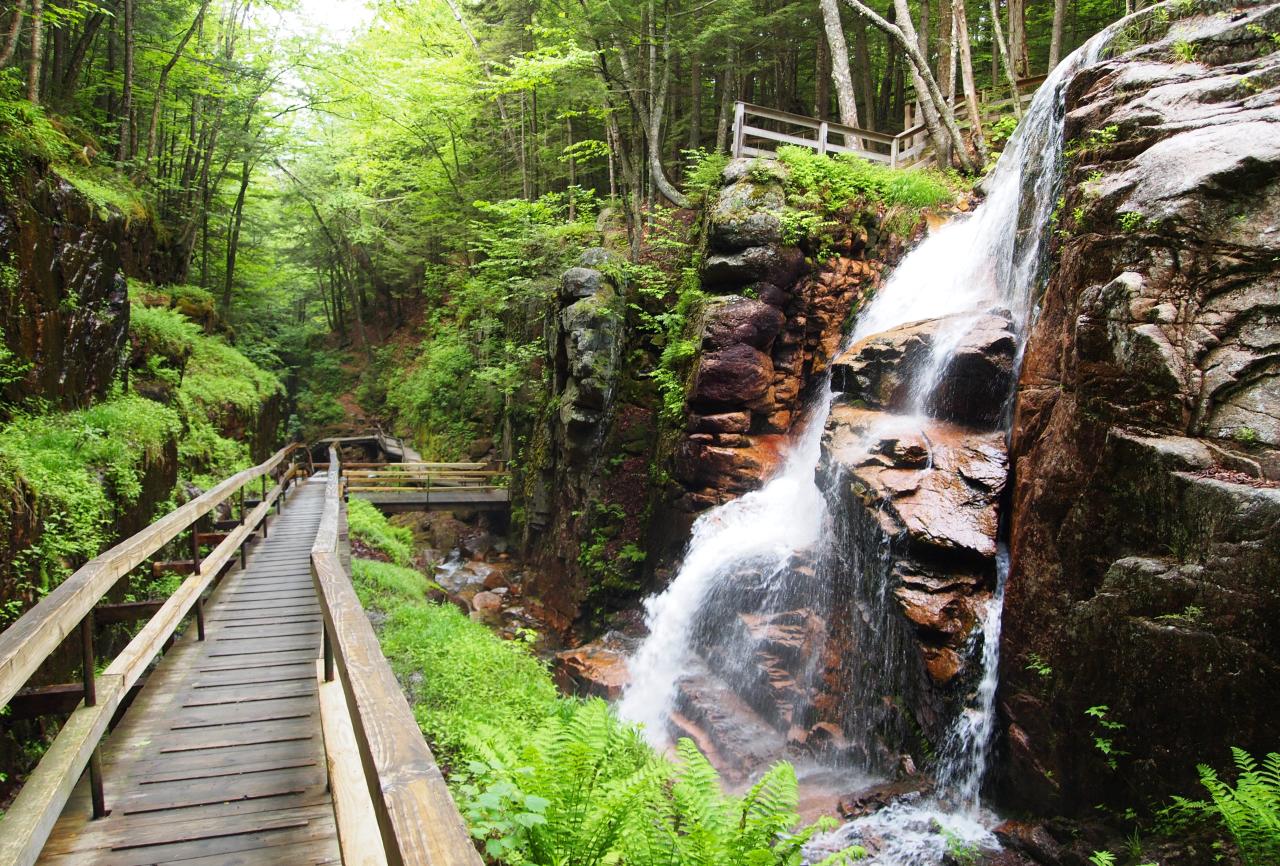
High-Quality Images: Capturing the Essence of the Trail
Pictures speak louder than words, especially when it comes to showcasing breathtaking natural beauty. High-quality images are essential for enticing users and giving them a realistic preview of what to expect. Consider these examples:
Image 1: The Grand Reveal. This wide-angle shot captures the entirety of the waterfall, showcasing its scale and power. Sunlight catches the mist rising from the water, creating a magical, ethereal effect. Lush greenery frames the scene, emphasizing the trail’s natural setting. This image inspires awe and wonder.
Image 2: The Trail’s Journey. This image focuses on a section of the trail winding through a forest, leading towards the waterfall in the distance. It provides a sense of scale and adventure, highlighting the journey itself as much as the destination. The photo should be sharp and detailed, showcasing the texture of the path and the surrounding foliage.
Image 3: A Moment of Tranquility. This close-up shot captures the detail of the waterfall’s cascading water, focusing on the texture and movement of the water. Perhaps a single person is shown enjoying the view, emphasizing the peaceful and restorative aspect of the hike. This image creates a sense of serenity and invites viewers to imagine themselves in that moment.
Structuring Trail Information for Enhanced User Experience
Clear, concise, and well-organized information is key to a positive user experience. Prioritize key details such as difficulty level, distance, elevation gain, and unique features like waterfalls. Use bullet points and headings to break up text and make it easy to scan. Consider incorporating interactive elements like maps or 360° views to further enhance engagement. Remember, the goal is to inspire adventure while providing practical information.
Ultimate Conclusion

So there you have it – your passport to paradise, or at least, to some seriously stunning waterfall hikes! Remember, the perfect trail is out there, waiting to be discovered. Whether you’re a seasoned hiker or a newbie ready to take the plunge (pun intended!), this guide has equipped you with the knowledge and resources to plan your next unforgettable adventure.
Now go forth, conquer those trails, and let the majestic roar of waterfalls soundtrack your journey! Happy hiking!