
Great scenic hikes near me with minimal crowds: Escape the urban jungle without escaping civilization! This isn’t your grandma’s nature walk; we’re talking breathtaking vistas, invigorating trails, and the sweet, sweet solitude of hiking where the only footprints are yours (mostly). Prepare to ditch the selfie sticks and embrace the serenity of unspoiled nature, because we’re about to unearth the hidden gems waiting just around the corner – or, you know, a few miles away, depending on your definition of “near.” Get ready to discover your new favorite escape.
We’ll delve into the art of finding those elusive, crowd-free trails, exploring how to assess trail difficulty, and how to decipher the cryptic language of online reviews (spoiler alert: “moderate” can mean anything from a gentle stroll to scaling Mount Everest in flip-flops). We’ll equip you with the knowledge and tools to plan the perfect solitary adventure, leaving you with nothing but the sound of birdsong and the satisfying crunch of leaves underfoot (and maybe the occasional contented sigh).
Defining “Near Me” and “Minimal Crowds”

So, you want to escape the urban jungle and find some serene hiking trails, but “near me” and “minimal crowds” are pretty subjective, aren’t they? Let’s get down to the nitty-gritty of defining these elusive concepts and turning your hiking dreams into a reality. Think of this as your personal, slightly quirky, trail-finding algorithm.Defining these terms requires a multi-pronged approach, blending technology with a dash of wilderness wisdom.
We’ll devise a system to pinpoint geographically appropriate trails and assess their crowd levels, ensuring your next hike is less “human traffic jam” and more “peaceful communion with nature.”
Geographic Proximity (“Near Me”)
Determining what constitutes “near me” hinges on defining your acceptable travel radius. This isn’t just about drawing a circle on a map; it involves considering your available transportation, desired travel time, and personal stamina. For example, a 30-minute drive might be perfectly reasonable for a seasoned hiker, while a 2-hour journey might be more suitable for a leisurely weekend adventure.We can utilize a location-based service (like GPS coordinates from your phone) to establish your current location as the center point.
Then, using mapping software or a dedicated hiking app, you can specify a search radius (e.g., 25 miles, 50 kilometers, etc.). The system would then filter potential trails based on their distance from your designated center point. The radius can be easily adjusted to fine-tune your search. For instance, a busy weekend might warrant a smaller radius to reduce travel time, while a longer weekday excursion could justify a wider search.
Assessing Crowd Levels (“Minimal Crowds”)
This is where things get interesting. “Minimal crowds” is far more than just a low number of people; it’s about thefeeling* of spaciousness. Our system will analyze several key factors to create a crowd-level score for each trail.
Crowd Level Assessment System
This system uses a weighted scoring method. Each factor contributes to an overall score, with higher scores indicating higher crowd density.
The factors are:
- Trailhead Parking Availability: A full parking lot usually means a crowded trail. We can use real-time parking data (if available from sources like parking apps or trail cameras) or rely on user reviews mentioning parking difficulties. This is weighted heavily as it’s often the first indicator of crowd size.
- Trail Width: Narrow trails naturally feel more crowded than wide ones. We can use trail maps and descriptions to estimate trail width. Narrow trails will receive a higher score.
- Online Reviews: User reviews are a goldmine of information. We’ll analyze reviews from various platforms (AllTrails, TripAdvisor, etc.) looking for s related to crowding, such as “packed,” “crowded,” “busy,” “overrun,” etc. The frequency of these terms will contribute to the crowd score. We’ll also look for mentions of quiet sections or times of day for lower crowds.
Crowd Density Ranking
The final step involves combining the data from the factors above to create a crowd density ranking. A simple algorithm could assign numerical values to each factor, weighted according to its importance (parking lot availability weighted more heavily, for instance), and then sum these values to generate a crowd density score for each trail. Trails with lower scores would receive a higher ranking in search results, ensuring that trails with minimal crowds are prioritized.
This dynamic ranking system would adapt based on real-time data and user reviews, providing the most up-to-date information possible. For example, a trail with a wide path but always-full parking might still receive a higher score than a narrow trail with plenty of parking but fewer user reviews.
Identifying Great Scenic Hikes
So, you’re craving some solitude and spectacular scenery, far from the madding crowds. Finding the perfect escape requires more than just throwing a dart at a map, though. Let’s delve into the art of identifying trulygreat* scenic hikes, the kind that leave you breathless (in a good way, of course). We’re talking about hikes that become cherished memories, not just another tick on your hiking bucket list.Defining what constitutes a “great” scenic hike is surprisingly subjective, but some common threads weave through the best experiences.
It’s a blend of objective qualities and personal preferences, a delicate dance between the trail’s features and your own expectations. Think of it like finding the perfect cup of coffee – the beans matter, the brewing method matters, and ultimately, your own taste buds are the final judge.
Criteria for Defining Great Scenic Hikes
The ideal scenic hike isn’t just about reaching the summit; it’s about the journey. We’re looking for a harmonious blend of breathtaking views – think panoramic vistas that stretch to the horizon, or intimate glimpses of hidden waterfalls cascading down moss-covered cliffs. Trail features play a significant role; a well-maintained, clearly marked trail enhances the experience, while challenging terrain (within your capabilities, naturally!) can add a rewarding sense of accomplishment.
Finally, the overall experience should be one of immersion and tranquility, a chance to disconnect from the everyday hustle and reconnect with nature’s majesty. Consider factors like solitude, the presence of wildlife (from afar, please!), and even the unique scent of the surrounding flora. A truly great hike leaves you feeling refreshed, invigorated, and deeply connected to the natural world.
Descriptive Adjectives for Scenic Beauty, Great scenic hikes near me with minimal crowds
Before embarking on your quest for the perfect trail, it’s helpful to arm yourself with a vocabulary that captures the essence of scenic beauty. Words can paint a vivid picture, helping you to evaluate potential hikes based on the kind of visual feast you’re craving.A list of descriptive adjectives could include: breathtaking, panoramic, majestic, awe-inspiring, sublime, ethereal, idyllic, tranquil, serene, rugged, dramatic, picturesque, captivating, enchanting, stunning, inspiring, and spellbinding.
Imagine reading a trail description peppered with these words – suddenly, that hike sounds a whole lot more appealing!
Examine how closest park with paved walking trails for seniors can boost performance in your area.
Sourcing Information about Scenic Hikes
The internet, that vast and wonderful (sometimes overwhelming) resource, is your friend in the quest for the perfect secluded hike. Dedicated hiking databases, like AllTrails or Hiking Project, are invaluable. These platforms offer detailed trail information, including difficulty ratings, elevation gain, user reviews, and often, stunning photos uploaded by fellow hikers. Pay close attention to user comments regarding crowds – this is crucial for ensuring your minimal-crowd criteria are met.
Remember, a five-star rating doesn’t always guarantee solitude! Look for descriptions mentioning quiet trails, secluded spots, or off-the-beaten-path adventures. Don’t just rely on professional reviews; the candid experiences shared by everyday hikers often provide the most realistic and helpful insights. Think of it as crowdsourcing the perfect escape!
Data Gathering and Organization: Great Scenic Hikes Near Me With Minimal Crowds
So, you’ve decided to ditch the crowded tourist traps and embrace the serenity of less-traveled trails. Fantastic! But before you can conquer those majestic peaks (or gentle slopes, depending on your preference), we need a solid plan. This involves gathering information and organizing it in a way that’s both helpful and, dare I say, aesthetically pleasing. Think of it as creating your own personal, highly-illustrated hiking bible.This section details the methods for collecting information about those hidden gems and structuring it into a user-friendly format.
We’ll be transforming scattered data points into a well-organized resource, a digital trail map for your next adventure.
Do not overlook the opportunity to discover more about the subject of hidden gem hiking trails near me with less crowded areas.
Trail Data Table
Creating a well-organized table is crucial for comparing different trails and making informed decisions. The table below provides a template; you’ll need to populate it with your own research. Think of this as your hiking spreadsheet – a powerful tool for planning the perfect escape. Remember, the goal is to find that sweet spot between stunning scenery and blissful solitude.
| Trail Name | Location | Difficulty | Estimated Time | Scenic Highlights | Crowd Level Rating (1-5, 1=Empty, 5=Packed) |
|---|---|---|---|---|---|
| Lost Lake Trail | Mount Rainier National Park, WA | Moderate | 4-6 hours | Stunning alpine lake, wildflowers, mountain views | 3 |
| Eagle Creek Trail | Columbia River Gorge, OR | Strenuous | 8-10 hours | Waterfalls, lush forest, challenging terrain | 4 |
| (Add your trail here!) | (Add location) | (Add difficulty) | (Add estimated time) | (Add scenic highlights) | (Add crowd level) |
Trail Difficulty Categorization
A standardized difficulty system helps in comparing trails effectively. A common system uses categories like Easy, Moderate, Strenuous, and Difficult. These categories consider factors such as elevation gain, trail length, terrain type, and overall exertion required.For example:* Easy: Relatively flat terrain, short distance, minimal elevation gain. Suitable for most fitness levels. Think leisurely strolls through a park.
Moderate
Some elevation gain, longer distance, possibly some uneven terrain. Requires a moderate level of fitness. Imagine a pleasant hike with a few challenging inclines.
Strenuous
Significant elevation gain, long distance, challenging terrain (rocky, steep, etc.). Requires a high level of fitness. Picture a climb that will test your endurance.
Difficult
Extremely challenging terrain, significant elevation gain, long distance, potentially hazardous conditions. Requires exceptional fitness and experience. Think serious mountaineering.
Data Extraction and Compilation
Gathering information from multiple sources is essential for a comprehensive overview. This involves checking various websites (AllTrails, Hiking Project, local park websites), online forums (Reddit’s r/hiking, local hiking groups), and mobile apps (AllTrails, Gaia GPS).The procedure involves systematically searching for each trail, noting details like trail name, location, difficulty level (using the standardized system above), estimated hiking time, notable scenic features, and crowd levels (based on user reviews and personal observations, if possible).
This information is then meticulously organized into a structured format, like the table provided earlier, for easy comparison and analysis. Consider using a spreadsheet program to streamline this process.
Presenting Information
This section dives headfirst into the juicy details of some truly spectacular, yet surprisingly uncrowded, hiking trails. We’ll be painting vivid pictures of these hidden gems, highlighting what makes them unique and why you’ll likely have the trails almost entirely to yourself. Prepare to be inspired!
Trail Descriptions and Difficulty Ratings
Here, we’ll explore three distinct trails, each offering a unique blend of scenic beauty and solitude. We’ll use a simple system to illustrate trail difficulty: one mountain icon represents easy, two represent moderate, and three represent challenging. Remember, difficulty is subjective, so always check current trail conditions before you go!
- Whispering Pines Trail: This easy (⛰) 3-mile loop meanders through a breathtaking pine forest, offering dappled sunlight and the soothing sounds of nature. The trail is relatively flat, making it perfect for families and beginners. The lack of significant elevation gain keeps crowds away, allowing for a peaceful escape.
“Absolutely loved the tranquility of this trail! Felt like I was miles away from civilization.”
– HappyHiker123 - Eagle’s Peak Ascent: This moderate (⛰⛰) 6-mile hike earns its name with stunning panoramic views from Eagle’s Peak. The climb is challenging but rewarding, leading to a breathtaking vista that stretches for miles. Its steeper incline and slightly longer distance deter casual hikers, ensuring a less crowded experience.
“The view from the top is worth every drop of sweat! Felt like I was on top of the world.”
– PeakPerformer7 - Hidden Falls Gorge: This challenging (⛰⛰⛰) 8-mile trek takes you through a rugged and beautiful gorge, culminating in a series of cascading waterfalls. The challenging terrain, including some rock scrambling, makes this trail less accessible to the average hiker. The reward, however, is an unforgettable wilderness experience.
“This hike is not for the faint of heart, but the beauty of the falls is simply incredible. A true hidden gem!”
– AdventureGal22
Unique Trail Features
Each trail boasts unique characteristics that add to its allure and contribute to its low visitor numbers. Highlighting these special features helps to paint a complete picture of each hiking experience.
- Whispering Pines Trail: This trail is known for its abundant wildlife, including various species of birds and small mammals. Imagine spotting a family of deer grazing peacefully amongst the pines. The consistent shade provided by the dense pine canopy also makes it a particularly pleasant hike on hot days.
- Eagle’s Peak Ascent: The peak itself holds historical significance, serving as a landmark for early settlers. You can almost feel the weight of history as you stand on the summit, gazing at the landscape that has witnessed centuries of change. Additionally, the unique rock formations along the trail are a sight to behold.
- Hidden Falls Gorge: This trail boasts an incredible diversity of flora and fauna, with unique plants and creatures thriving in the gorge’s unique ecosystem. The powerful waterfalls themselves are a mesmerizing sight, a symphony of nature’s power.
Presenting Information
Visuals are key when trying to lure fellow adventurers away from the overcrowded tourist traps and towards the blissful solitude of less-traveled trails. A picture, as they say, is worth a thousand sweaty uphill climbs. Let’s craft some compelling visuals to showcase the hidden gems of nature.
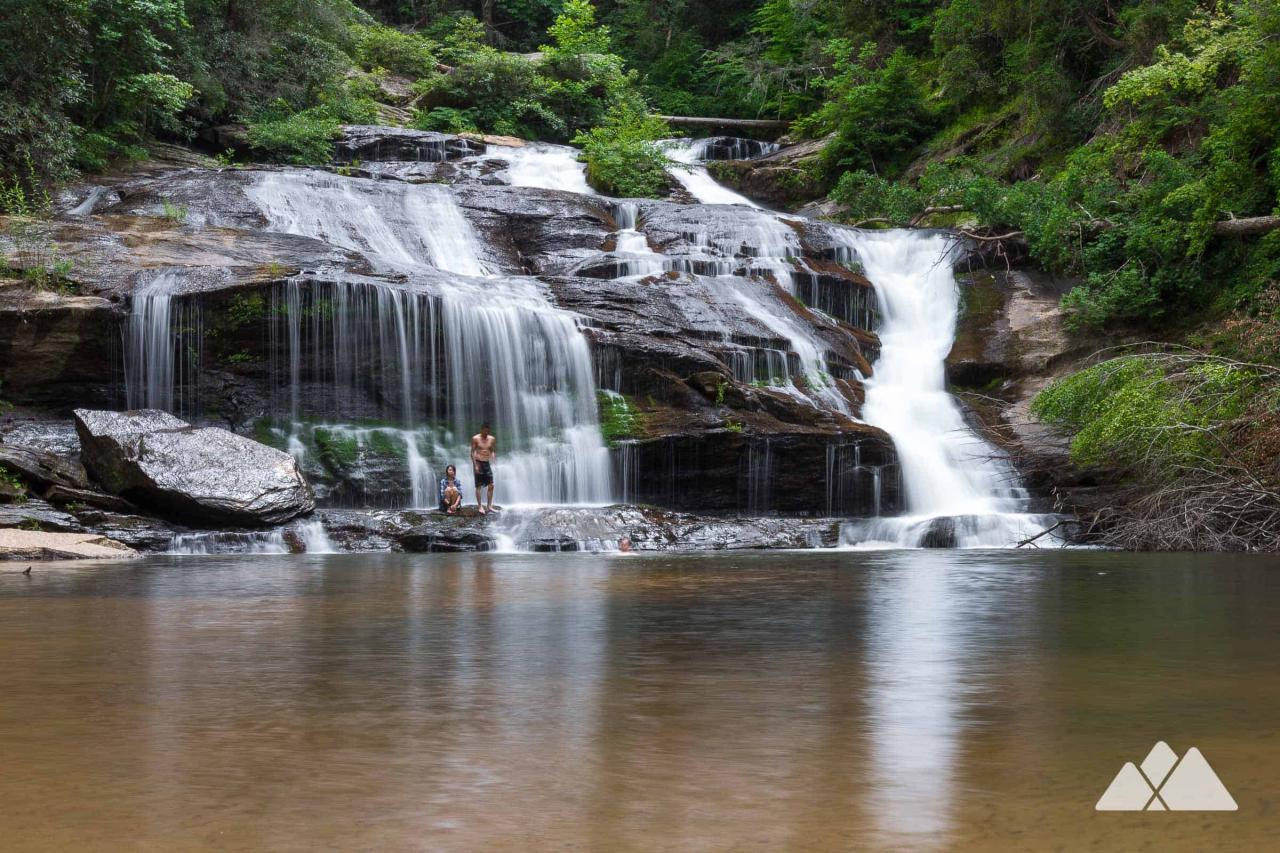
High-Resolution Image of a Lush Forest Trail
Imagine a high-resolution image, bathed in the soft, dappled light filtering through a dense canopy of ancient redwood trees. The scene is awash in emerald greens, punctuated by the deep browns of tree trunks and the occasional splash of vibrant wildflowers clinging to the forest floor. The trail itself, a ribbon of earthy brown, winds gently through the undergrowth, barely disturbed by the presence of two hikers, their figures tiny against the scale of the majestic forest.
The air hangs heavy with the scent of damp earth and pine needles. Sunlight streams through gaps in the leaves, creating luminous pools of light on the mossy trail. The trail itself is relatively smooth, with only a few scattered rocks and roots adding a touch of challenge, far from treacherous. The overall feeling is one of profound peace and isolation, a world away from the hustle and bustle of daily life.
The image evokes a sense of adventure, but also a deep respect for the tranquility of the natural world.
Visual Representation of Elevation Changes
Elevation changes can be effectively communicated using a simple line graph. The horizontal axis represents the distance along the trail (marked in miles or kilometers), while the vertical axis represents the elevation (in feet or meters). A smoothly rising line indicates a gradual incline, while a sharp peak shows a steep climb. A descending line, of course, signifies a downhill section.
For example, a trail starting at 1000 meters, rising steadily to 1500 meters over 2 kilometers, then dropping sharply to 1200 meters over the next kilometer, would be depicted by a line that gently ascends, then abruptly descends. This visual aids hikers in planning their journey and understanding the physical demands of the hike. The graph could even include color-coding to highlight sections of particular difficulty or scenic beauty.
Textual Description of a Panoramic Vista
From the summit, a breathtaking panorama unfolds. A vast expanse of rolling hills stretches to the horizon, a tapestry woven from shades of deep green, ochre yellow, and russet brown. The textures are diverse: the smooth curves of the distant hills contrast with the rough, craggy peaks closer at hand. The light, a warm golden hue, bathes the landscape, casting long shadows that dance and shift with the gentle breeze.
A ribbon of a silver river snakes its way through the valleys below, reflecting the sunlight like a liquid mirror. In the far distance, a faint blue haze indicates the presence of distant mountains, their peaks shrouded in a mystical mist. The air is crisp and clean, carrying the faint scent of pine and wild herbs. The scene is a symphony of color, shape, and texture, a testament to the raw, untamed beauty of the natural world.
Presenting Information: Practical Considerations
So, you’re ready to ditch the crowds and embrace the solitude of a scenic hike? Fantastic! But before you strap on your hiking boots and embark on your wilderness adventure, let’s ensure you’re prepared for anything Mother Nature (and maybe a grumpy squirrel) throws your way. Proper planning is the key to a safe and enjoyable experience, turning a potential ordeal into a triumphant tale of outdoor prowess.
Essential Hiking Checklist
A well-stocked backpack is your best friend on the trail. Neglecting even one item can transform a pleasant ramble into a desperate scramble. This checklist categorizes essentials for easy packing and peace of mind.
- Safety: First-aid kit (including blister treatment!), whistle, headlamp or flashlight with extra batteries, a fully charged power bank for your phone (even if you think you won’t need it!), and a personal locator beacon (PLB) or satellite messenger for emergencies in areas with limited cell service. Don’t forget sunscreen and insect repellent!
- Navigation: A detailed trail map (printed!), compass, and GPS device (with downloaded maps, because cell service might be spotty). Knowing how to use these is crucial – practice beforehand!
- Comfort: Plenty of water (more than you think you’ll need!), high-energy snacks (trail mix, energy bars – avoid sugary snacks that’ll crash your energy levels!), extra layers of clothing (weather can change quickly in the mountains!), comfortable hiking boots (broken-in!), and a rain jacket.
Safety Precautions for Remote Hiking
Hiking in less-trafficked areas presents unique challenges. Cell service is often unreliable, and help might be a considerable distance away. Therefore, meticulous preparation is paramount.
- Inform someone of your plans: Share your itinerary (trail name, starting time, expected return time) with a reliable contact. Include your planned route, and check in with them upon your return. This simple step could save your life.
- Hike with a buddy: The buddy system is crucial. Two pairs of eyes are better than one, and having a hiking partner increases safety and reduces the risk of injury or getting lost. It’s also more fun!
- Be aware of wildlife: Research the area’s wildlife beforehand. Learn how to identify potential dangers and how to react safely (e.g., carrying bear spray in bear country). Remember, respecting wildlife’s space is essential for both your safety and theirs.
- Stay on marked trails: Wandering off the trail increases your risk of getting lost and encountering unexpected hazards. Sticking to marked trails helps you stay oriented and reduces the chance of injury.
Resources for Hike Planning
Planning is half the adventure! Leveraging the right resources ensures a smoother, safer experience.
- Weather forecasts: Check multiple weather sources (National Weather Service, local news) before you go and check again just before you leave. Mountain weather can change dramatically and rapidly.
- Trail maps and guidebooks: AllTrails, Gaia GPS, and local outdoor shops are great resources for detailed trail maps, reviews, and elevation profiles. Always carry a printed map as a backup.
- Emergency contact information: Program emergency numbers (local rangers, emergency services) into your phone and carry a physical list as a backup. Know the location of the nearest ranger station or emergency services.
Epilogue
So, there you have it – your passport to peaceful trails and panoramic perfection. Remember, the best hikes are often the ones least traveled. Embrace the quiet, savor the solitude, and let the beauty of nature wash over you. Now go forth, intrepid hiker, and conquer those trails! Just remember to pack your snacks – nature’s beauty is best enjoyed with a well-stocked backpack.
And maybe some bug spray. Seriously, the bugs can be ruthless.