
Looking for easy hikes near me with stunning scenery? Forget grueling climbs and treacherous terrain! This isn’t your grandpappy’s hiking guide (unless your grandpappy was a surprisingly nimble mountain goat). We’re talking breathtaking vistas achieved with minimal sweat, maximum scenery. Prepare to ditch the hiking boots (maybe, just maybe) and embrace the beauty of nature without the backache.
Think less “conqueror of peaks” and more “casual admirer of epic views.” Let’s find your perfect, pain-free path to postcard-worthy panoramas.
This guide will help you define what “easy” and “stunning” mean to
-you*, then use online tools to locate trails matching your criteria. We’ll cover everything from checking trail conditions to packing the perfect snack (because let’s be honest, that’s half the fun). We’ll even share tips for capturing those Instagram-worthy shots – because bragging rights are essential. Get ready to trade your couch for a trail, and your Netflix binge for a nature-fueled adventure!
Defining “Easy” and “Stunning Scenery”

So, you’re looking for an easy hike with stunning scenery? Excellent choice! But let’s get one thing straight: “easy” and “stunning” are highly subjective terms, about as concrete as a cloud made of marshmallows. What one person considers a leisurely stroll, another might deem a grueling marathon. Similarly, breathtaking vistas are in the eye of the beholder – a field of wildflowers might send one person into raptures, while another craves the dramatic peaks of a mountain range.
Let’s unpack these slippery concepts.
Defining “easy” in the context of hiking requires a multifaceted approach. It’s not simply about distance, though that certainly plays a role. Elevation gain, trail conditions (think smooth paths versus rocky scrambles), and even the weather can significantly impact the perceived difficulty. A short, steep hike on a muddy trail might feel harder than a longer, flatter walk on a well-maintained path.
Finish your research with information from scenic walking trails near me with breathtaking panoramic views.
Easy Hike Difficulty Levels and Associated Scenery
Let’s create a framework to help you classify “easy” hikes. The following table considers distance, elevation gain, and trail conditions to offer a range of difficulty levels, each paired with examples of scenery you might encounter.
| Difficulty Level | Distance (approx.) | Elevation Gain (approx.) | Trail Conditions & Example Scenery |
|---|---|---|---|
| Very Easy | 1-2 miles | < 200 feet | Flat, paved or well-maintained trail; Scenic parkland with flowering meadows, a tranquil lake, or a gentle riverside walk. Imagine a stroll through a vibrant botanical garden, showcasing a diverse array of flora. |
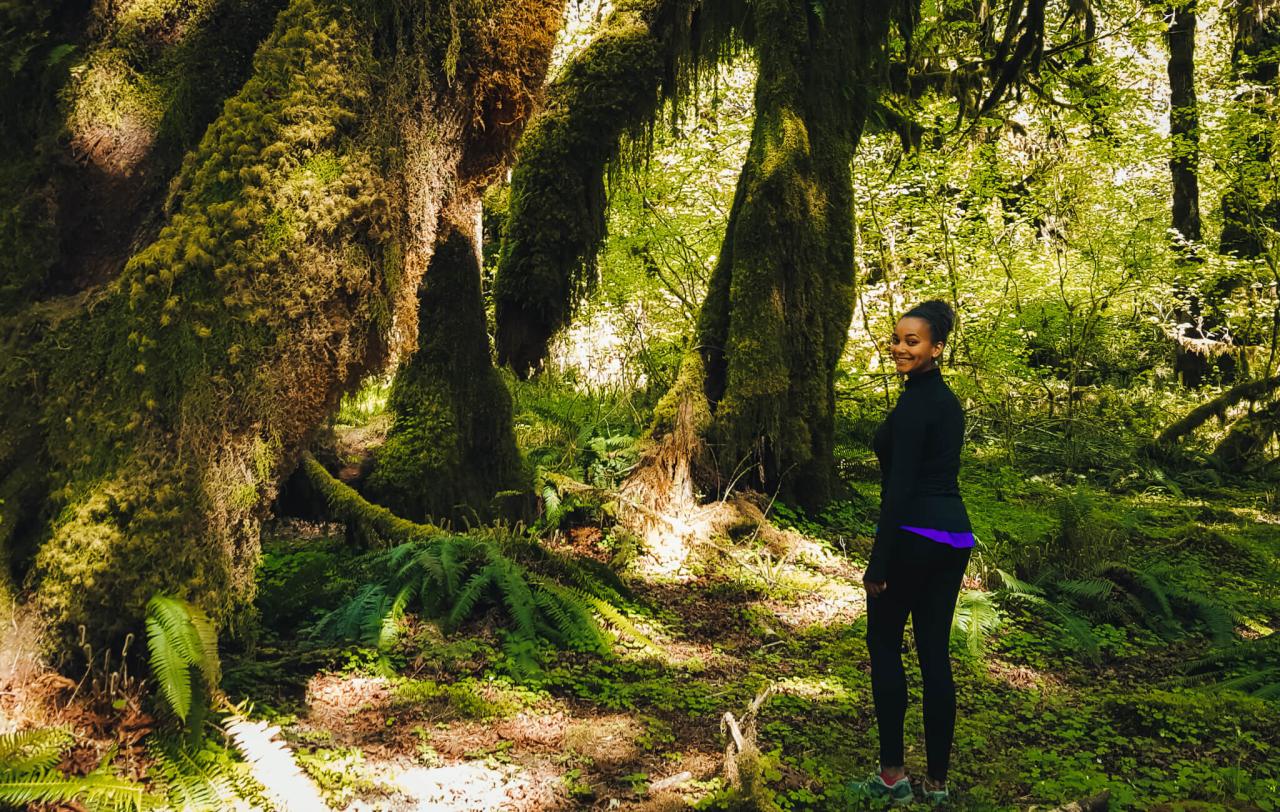
| Easy | 2-4 miles | 200-500 feet | Mostly gentle inclines, well-marked trail; Wooded trails with dappled sunlight filtering through the canopy, perhaps leading to a scenic overlook with a panoramic view of rolling hills or a valley. Picture a charming forest path, carpeted with soft moss and dotted with ancient trees. |
| Moderate (borderline easy) | 4-6 miles | 500-1000 feet | Some steeper sections, possibly some rocky terrain, but still well-maintained; Coastal trails with dramatic cliffs and ocean views, or a mountain trail with stunning views from a moderately challenging ascent. Envision a path winding along a dramatic coastline, with the sound of crashing waves providing a constant soundtrack. |
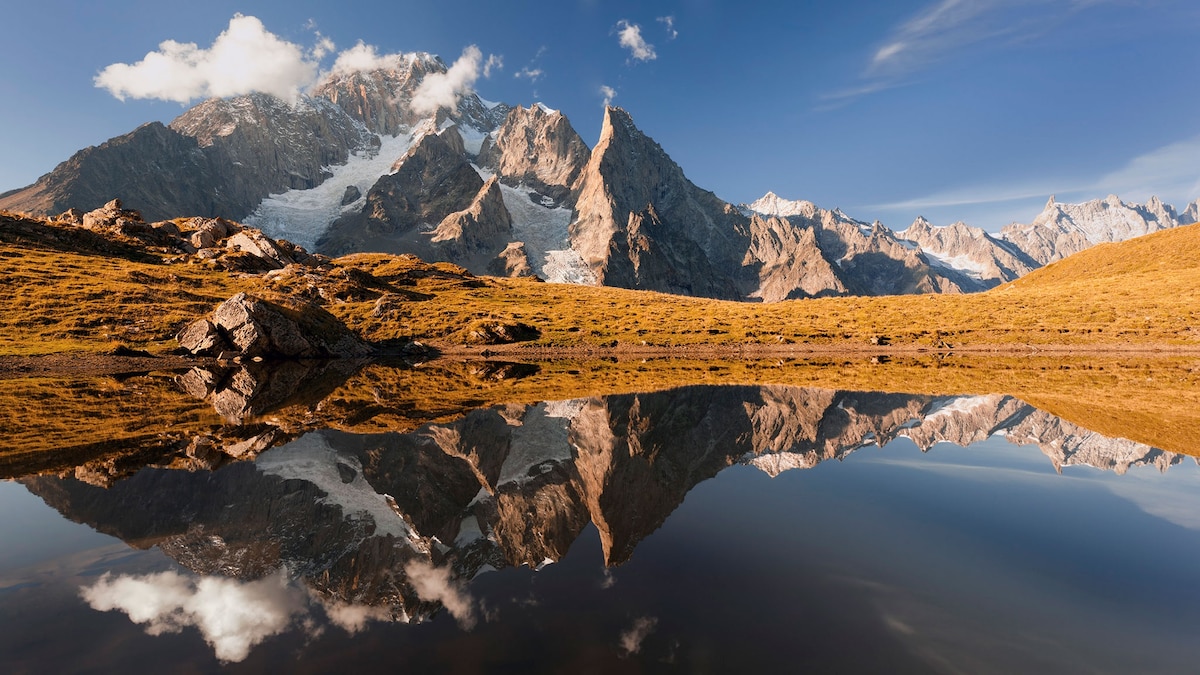
| Not Easy (for reference) | >6 miles | >1000 feet | Steep inclines, uneven terrain, possibly requiring some scrambling; High-altitude mountain trails with breathtaking panoramic views of jagged peaks and alpine meadows. Picture a challenging mountain ascent, rewarding hikers with panoramic views from a summit overlooking a vast expanse of mountains and valleys. |
Defining “Stunning Scenery”
Now, let’s tackle the equally subjective “stunning scenery.” This is where personal preferences truly come into play. What constitutes a breathtaking view for one person might leave another utterly unimpressed. However, we can identify some common landscape features that frequently evoke a sense of awe.
Consider the vastness of a desert landscape, the tranquility of a hidden waterfall cascading into a crystal-clear pool, the vibrant colors of an autumn forest, the dramatic cliffs and crashing waves of a rugged coastline, the majestic peaks of a mountain range piercing the sky, or the serene beauty of a secluded lake nestled amidst towering trees. The possibilities are as endless as your imagination (and your hiking boots!).
Locating Nearby Hiking Trails
So, you’re ready to ditch the couch and embrace the great outdoors, but navigating the wilderness (even the “easy” kind) can feel like navigating a particularly thorny blackberry bush. Fear not, intrepid hiker! Finding the perfect easy trail with stunning scenery doesn’t require a Sherpa or a PhD in cartography. With a little digital know-how, you’ll be conquering those trails faster than you can say “nature’s ibuprofen.”Online resources are your best friends in this quest.
Think of them as your personal, digitally-powered trailblazers, always ready with a helpful hint and a map (and maybe a virtual high-five).
Utilizing Online Resources for Trail Discovery
AllTrails, a treasure trove of user-submitted trail information, is a fantastic starting point. Simply enter your location, specify your desired difficulty level (remember, we’re sticking to “easy”!), and let the app do its magic. You’ll be presented with a plethora of options, complete with photos, reviews, and elevation profiles. Don’t underestimate the power of local park websites either! Many parks and recreation departments maintain their own websites with detailed trail maps, descriptions, and often, helpful tips from seasoned locals.
These websites are often less cluttered than broader search engines and are great for finding hidden gems. Think of them as the insider tips from the neighborhood hiking guru. Finally, a simple Google search with terms like “easy hikes near [your city/town]” can also yield surprisingly good results.
Verifying Trail Information Before Hiking
Before you lace up those boots and hit the trail, remember that the internet, while amazing, isn’t always perfectly accurate. Think of trail reviews as Yelp reviews for hikers: some are five-star raves, others are one-star cautionary tales. Always cross-reference information from multiple sources. Check multiple reviews on AllTrails, compare them to the park’s official website information, and if possible, even check recent social media posts from hikers who’ve recently been on the trail.
This will help you identify any recent changes, such as trail closures, unexpected obstacles (like a rogue family of squirrels guarding a particularly delicious acorn), or even just updated trail conditions.
Using a Map Application for Trail Navigation
Let’s say you’ve found your perfect trail. Now it’s time to use a map application like Google Maps, Apple Maps, or even a dedicated hiking app (many hiking apps integrate with AllTrails). Here’s a simple step-by-step guide:
- Input your destination: Type in the trailhead’s name or address into your map app. Many apps will even allow you to search directly within the app using the trail name from AllTrails.
- Check the route: Examine the map carefully. Note any potential challenges, such as steep inclines (remember, we’re aiming for “easy”!), stream crossings, or areas with limited cell service.
- Download the map (offline mode): This is crucial, especially if you’re venturing into areas with weak or no cell service. Most map apps allow you to download maps for offline use, ensuring you won’t get lost in the digital wilderness as well as the physical one.
- Follow the directions: Use the app’s navigation feature to guide you to the trailhead and, if needed, along the trail itself. Pay close attention to the map, especially at junctions or points where the trail might be unclear.
- Mark your location: Periodically check your location on the map to ensure you’re staying on track. This is especially important if you deviate from the trail for any reason.
Remember, technology is a tool, not a replacement for common sense and preparedness. Always let someone know your hiking plans, carry plenty of water and snacks, and be aware of your surroundings. Happy hiking!
For descriptions on additional topics like explore amazing hiking trails near me with stunning forest views, please visit the available explore amazing hiking trails near me with stunning forest views.
Assessing Trail Suitability
So, you’ve found a few potential hiking trails, but how do you know if they’re actually “easy” and suitable for your abilities? Choosing the right trail is crucial to avoid turning a scenic stroll into a grueling ordeal (or worse, a rescue mission!). Let’s delve into the art of trail assessment, turning you from a hiking novice into a trail-savvy explorer.Trail suitability isn’t just about the breathtaking views; it’s a careful consideration of several factors that ensure a safe and enjoyable experience.
Ignoring these factors can lead to disappointment, exhaustion, or even injury. Think of it as pre-flight checks for your hiking adventure – you wouldn’t board a plane without them, would you?
Trail Length and Elevation Gain
Trail length and elevation gain are fundamental factors determining a hike’s difficulty. A longer trail, even with minimal elevation change, can be tiring, especially for beginners. Conversely, a short trail with significant elevation gain can be surprisingly challenging. For example, a 5-mile trail with a gradual incline is generally easier than a 2-mile trail with a steep ascent.
Always check the trail’s total distance and the total elevation gain (often expressed in feet or meters) to gauge the physical demands. Many online trail guides provide this information clearly. Consider your fitness level and experience honestly; don’t overestimate your abilities!
Trail Surface and Conditions
The type of trail surface significantly impacts the difficulty. A well-maintained, smooth trail is much easier to navigate than a rocky, uneven, or root-filled path. Consider also trail conditions, which can change dramatically depending on weather. Muddy trails after rain can be treacherous, while icy trails in winter pose a serious risk. Checking recent trail reports and weather forecasts before you set out is vital for a safe and enjoyable hike.
Imagine attempting a rocky trail in the rain – not exactly a recipe for a relaxing day!
Reviews and User Experiences
Online reviews offer invaluable insights into a trail’s actual difficulty. Don’t just look at the star rating; read the comments! Other hikers often provide detailed accounts of the trail’s challenges, including unexpected obstacles, trail maintenance, and overall experience. Comparing reviews from different sources, such as AllTrails, Hiking Project, and local tourism websites, can give you a more comprehensive picture.
Remember, subjective experiences can vary, but consistent themes (e.g., “steep climb,” “muddy sections,” “well-maintained”) should be taken seriously.
Comparing Information from Different Sources
- AllTrails: Often provides detailed elevation profiles, user photos, and a wide range of reviews.
- Hiking Project: Known for its comprehensive trail data, including length, elevation gain, and trail type.
- Local Tourism Websites: May offer more localized information, including trail closures, parking details, and safety advisories. They might also have less detailed user reviews than dedicated hiking platforms.
Discrepancies between sources might occur. For example, one site might list a trail as “easy,” while another rates it as “moderate.” In such cases, carefully weigh the different factors described above and consider your own fitness level to make an informed decision. Don’t hesitate to err on the side of caution.
Crucial Aspects for Determining Trail Suitability
Before heading out, consider this checklist:
- Trail Length: Is it within your physical capabilities?
- Elevation Gain: Are you prepared for significant uphill climbs?
- Trail Surface: Is it well-maintained or rocky and uneven?
- Recent Reviews: Do user reports mention any unexpected challenges or hazards?
- Weather Conditions: Are the weather forecasts favorable for hiking?
Planning the Hike: Looking For Easy Hikes Near Me With Stunning Scenery

So, you’ve found your perfect easy, stunning-scenery hike. Fantastic! Now for the slightly less glamorous, but equally crucial, part: planning. Think of this as the pre-game warm-up for your breathtaking adventure – proper preparation prevents pathetic performance (and potential peril!).Proper planning ensures a safe and enjoyable hike, transforming a potential ordeal into a memorable experience. Failing to plan is planning to fail, as the old saying goes.
Let’s make sure you’re prepared for anything the trail throws your way.
Essential Hiking Checklist
A well-stocked backpack is your best friend on the trail. Forget that tiny purse; we’re talking serious hiking gear here. The items below aren’t just suggestions, they’re your hiking survival kit.
- Appropriate Footwear: Think sturdy hiking boots or trail runners, broken in and comfortable. Flip-flops are a definite no-no, unless you enjoy blisters the size of small rodents.
- Water: Bring more water than you think you’ll need. Dehydration is a real buzzkill (and potentially dangerous). A good rule of thumb is at least one liter per hour of hiking.
- Snacks: Energy bars, trail mix, fruit – anything to keep your energy levels up. Think of it as fuel for your adventure machine.
- Map and Compass/GPS: Even with a phone, a physical map is a good backup. Knowing your way around is crucial, especially if cell service is spotty (or nonexistent).
- First-aid Kit: Band-aids, antiseptic wipes, pain relievers – the essentials for minor scrapes and aches. Think of it as a mini-hospital in your bag.
- Sunscreen and Hat: Protect yourself from the sun’s rays, especially on sunny days. A sunburn can quickly turn a pleasant hike into a miserable one.
- Rain Gear: Even on a sunny day, weather can change quickly. A lightweight rain jacket and pants can be lifesavers.
- Headlamp or Flashlight: Just in case you’re out longer than expected (or get a little lost). It’s better to be prepared than to be stuck in the dark.
Informing Someone of Your Hiking Plans
This might seem like overkill, but it’s crucial for your safety. Let a friend, family member, or neighbor know your hiking plans, including:
- Trail Name: So they know exactly where you’re going.
- Expected Return Time: So they know when to start worrying (just kidding… mostly).
- Emergency Contact Information: Your phone number, and perhaps the number of someone else who can be reached in an emergency.
Creating a Detailed Hiking Itinerary
A detailed itinerary isn’t about micromanaging your hike; it’s about planning for potential delays and ensuring you get back safely before dark. Here’s an example for a 6-mile hike:
| Time | Activity | Location | Estimated Time |
|---|---|---|---|
| 8:00 AM | Start Hike | Trailhead | – |
| 9:30 AM | Rest Stop | Mile 2 marker | 15 minutes |
| 10:45 AM | Lunch Break | Scenic Overlook | 30 minutes |
| 12:15 PM | Continue Hike | Overlook | – |
| 2:00 PM | Reach Summit | Summit | – |
| 3:00 PM | Return to Trailhead | Summit | – |
| 4:30 PM | Finish Hike | Trailhead | – |
Remember, these areestimates*. Adjust your itinerary based on your pace and the trail’s difficulty. It’s better to have extra time built in than to rush and risk injury.
Enhancing the Hiking Experience
Let’s face it, even the most breathtaking vista can feel a little… underwhelming if your photos look like they were taken through a potato. And who wants to bore their friends with a monotone recounting of a hike that sounds like a tax audit? Elevating your hiking experience means elevating both your photographic skills and your storytelling prowess.
Let’s turn those trail memories into epic adventures, both visually and verbally.Capturing the beauty of a hike goes beyond simply pointing your phone at a tree. It’s about transforming fleeting moments into lasting memories that will make your friends green with envy (or at least slightly curious enough to ask you about your secret hiking spots).
Enhancing Photograph Visual Appeal
To make your photos pop, consider these simple techniques. Firstly, pay attention to the lighting. Golden hour (sunrise and sunset) offers the most flattering light, casting long shadows and creating a warm, magical ambiance. Avoid harsh midday sun, unless you’re aiming for a high-contrast, almost surreal look. Experiment with different angles – a slightly elevated perspective can add drama, while getting down low can emphasize scale and create a more intimate feel.
Finally, think about the rule of thirds: instead of centering your subject, place it off-center, along one of the imaginary lines that divide your frame into thirds both horizontally and vertically. This creates a more balanced and visually appealing composition. Imagine a majestic mountain range: instead of placing it dead center, offset it to one side, leaving space for the sky to breathe.
This simple adjustment dramatically improves the photo’s impact.
Capturing Scenery Beauty Through Photography, Looking for easy hikes near me with stunning scenery
Think of your camera as a storytelling device. Don’t just snap pictures; compose images. Consider the leading lines – a winding path, a river, even a row of trees – these can guide the viewer’s eye through your photograph. Include a sense of scale by including a human element – a person standing near a towering tree or a small wildflower in a vast meadow.
This provides context and makes the scenery more relatable. Experiment with different perspectives – a close-up shot of a vibrant flower can be just as captivating as a wide shot of a sprawling landscape. And remember, editing can enhance your photos without making them look fake. A little adjustment to brightness, contrast, and saturation can go a long way.
Descriptive Words and Phrases for Sharing Hiking Experiences
To truly transport your listeners to your hiking adventure, you need more than just “It was nice.” Instead, paint a vivid picture with your words.Prepare to unleash a torrent of descriptive words:
- Instead of “pretty,” try “ethereal,” “breathtaking,” “majestic,” “sublime.”
- Instead of “big,” try “immense,” “towering,” “colossal,” “expansive.”
- Instead of “nice view,” try “panoramic vista,” “stunning panorama,” “unobstructed view,” “sweeping vista.”
Weave in sensory details: “The crisp mountain air filled my lungs,” “The scent of pine needles hung heavy in the air,” “The sun warmed my face as I crested the ridge.” Use evocative verbs: “The river cascaded down the mountainside,” “The sunlight danced on the water,” “The wind whispered through the trees.” And don’t be afraid to use metaphors and similes: “The mountain peaks were like jagged teeth against the sky,” “The trail wound its way through the forest like a ribbon.” Remember, the goal is to create an experience for your audience, not just relay facts.
Respecting the Environment
Let’s face it, Mother Nature doesn’t appreciate litterbugs or trail-trampling tyrannosaurus-rexes (even the tiny, human-sized ones). Enjoying stunning scenery should come with a side of environmental responsibility. Leaving a place better than you found it isn’t just a nice idea; it’s crucial for preserving these natural wonders for future generations of hikers (and squirrels).Leaving no trace isn’t about being a super-serious eco-warrior; it’s about being a considerate adventurer.
It’s about minimizing your impact so that the next person can enjoy the same pristine beauty you experienced. Think of it as leaving a sparkling clean campsite for the next group of happy campers.
Leave No Trace Principles in Practice
The Leave No Trace principles provide a practical framework for minimizing your impact on the environment. These aren’t just suggestions; they’re guidelines for responsible enjoyment of nature. Following them ensures the trails remain beautiful and accessible for everyone.
- Plan Ahead and Prepare: Know your route, pack out everything you pack in, and check weather conditions. This prevents unexpected situations that might lead to you deviating from the trail or leaving behind trash.
- Travel and Camp on Durable Surfaces: Stick to established trails and campsites. Avoid creating new trails or widening existing ones. Imagine a well-worn path as opposed to a muddy, eroded mess – the former is the goal.
- Dispose of Waste Properly: Pack out all trash, including food scraps and toilet paper. This is non-negotiable. Wildlife isn’t keen on your discarded banana peel, and neither are future hikers.
- Leave What You Find: Resist the urge to collect rocks, plants, or other natural objects. Let nature be nature. Remember, taking something from the environment disrupts the delicate balance.
- Minimize Campfire Impacts: If campfires are allowed, use existing fire rings and keep fires small. Completely extinguish fires before leaving. A small spark can easily turn into a raging wildfire.
- Respect Wildlife: Observe animals from a distance and never feed them. Your seemingly harmless actions can have unforeseen consequences on their behavior and survival.
- Be Considerate of Other Visitors: Yield to others on the trail, keep noise levels down, and respect other hikers’ space and enjoyment of nature. Think of it as sharing a common space politely and respectfully.
Infographic: Responsible Hiking Practices
This infographic would visually represent the seven Leave No Trace principles.
- Visual: A central image of a hiker with a backpack, standing on a well-maintained trail overlooking a stunning vista.
- Text: “Leave No Trace: Seven Principles for Responsible Hiking”
- Seven sections, each representing a principle: Each section would include a concise description of the principle accompanied by a relevant icon (e.g., a map for planning, a footprint for durable surfaces, a trash can for waste disposal, etc.).
- Color scheme: Earthy tones (greens, browns) to emphasize the natural environment, with pops of brighter colors to highlight key messages.
- Overall style: Clean, simple, and easy to understand. The goal is clarity and memorability.
Final Review
So, there you have it – your passport to effortless exploration and unforgettable views. Remember, the best hikes are the ones you enjoy, not the ones that conquer you. Whether you’re a seasoned hiker looking for a relaxing stroll or a complete newbie taking your first steps on the trail, this guide has equipped you with the knowledge and confidence to find your own slice of scenic paradise.
Now get out there, breathe in the fresh air, and snap those stunning photos – your adventure awaits!